
So it's time for the homemade pasta challenge folks!
I promise you that your week long wait was well worth it, I certainly found the arm busting experience of making my own tagliatelle from scratch worth while! :) It'd be better if you find a nice comfy couch to sit on whilst reading this long post as this is a COMPLETE, step by step and carefully illustrated guide to making your pasta from scratch.
And yes, no machines/gadgets involved whatsoever, simply because ...
Pasta machines are for babies
Real women (men) use rolling pins!
Plain White Flour/Tipo 00 Flour (Around 150g - 200g per person)
Eggs (1 medium egg per 100g of flour - free range preferably)
 Using your hands (washed and thoroughly dry!) or a spatula, shape the flour into a mountain structure.
 With your fingers, gently make a well in the center of the flour and break the eggs into the well, both the yolks and egg whites.
 Using a fork or a knife, stir and mix the egg mixture slowly, incorporating the flour with it bit by bit. Try not to rush this and mix thoroughly as it will save more effort in the kneading process later.
 You'll notice that lumps start to form as more flour mixture is added. No worries though, just try your best to even out the lumpy bits and stir in all the flour gradually. Slow and steady :)
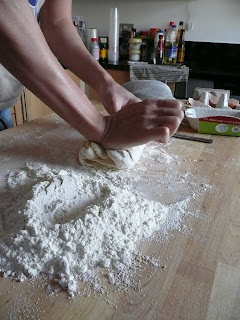
 When the mixture is very thick and impossible to mix use the fork/knife, this is where the arm busting kneading process starts! Despite the seemingly intimidating process, dough kneading is stress relieving and pretty therapeutic. Depending on how many people you're feeding, it may also be a good idea to split the dough and work with smaller pieces for starters, or split the workload with your dedicated friend/helper :) Thank God I'd P who was willing to help that day, despite being warned that his dinner may be at risk!
 Here's a bit of a tip on the kneading technique. Kneading isn't exactly pressing, so you don't need your thumbs or fingers to press the dough. Instead, a more energy efficient and pain free way (it matters when you're kneading for at least 30 minutes!) is using the palm of your hand for essentially the "Push-Pull Technique":
Use the heels of your hands and press firmly into the dough, pushing forward slightly. Then pull and fold the far edge of the dough upwards, towards you, and press it into the middle of the ball. Rotate it slightly, too, and repeat the steps until the dough is well mixed, unlumpy and not too sticky. The well kneaded dough ball should look yellowish due to the yolk, with no trace of improperly incorporated white flour.
Do note that in my first attempt I got the flour measurement wrong, and hence the whole pile of extra flour there now. In fact you probably only have a little extra for some dusting later on. With the 100g flour to 1 egg rule and you should be fine :)
Continue kneading ... ***knead^100***
 ... till the flour and egg is properly incorporated ... ***knead^300***

... into a light yellow dough ball ... ***knead^500***
 Do take a short break occasionally as it's understandable that kneading for the first time is pretty tiring for the arms! Try not to take too long though as the dough will dry out and you'll have brittle pastas, which would be shame after all the hard work!
 Just in case, here's a better graphical illustration of the kneading technique:
Use the heel of your hands to compress and push the dough away from you...
 then pull and fold it back over itself...

 If the dough gently springs back up once you relieve the pressure of your finger, then it's ready :) If not, just continue kneading and the lumps should be evenly mixed by then, it'd be springy in no time! For those who kneaded the dough in smaller portions, don't forget to combine them altogether at the end to rest.
Reaching this far, it's time to congratulate yourself for the hard work :D The hardest part is probably over and you're closer to your own homemade, authentic Italian pasta dinner ...
 You can cover Mr Smiley Dough with a big bowl for a 20 minutes rest, whilst you start off the celebration with a toast to your achievement so far!

 ... with the rolling pin and the dough! Let's start simple with the aim of simple pasta shapes :P So nothing complex, just roll the dough as thin as you can make it.
 rollin'

 ... till it gets as thin as you can make it to be, ideally 1mm. Don't rush off trying to get a ruler or something to measure for you engineers out there, you'll know it's thin enough when you can see your fingers and palms slightly underneath the rolled pasta sheet.
Finally, just fold in the sheet from both ends, in 2 inches/5cm each time, until you reach towards the center.
 I trimmed the uneven bits at the end due to my lousy rolling skills so that it looks nice and rectangular now - It was just an excuse for greedy me to just test those extra bits right away by plunging them into hot boiling water for roughly 2 minutes, and my my they tasted so soft, slippery yet al dente at the same time! First taste of hard labor and I'm excited and pleasantly surprised at the result :D

 and for those who thought it was a normal, mundane and even an uneventful task, perhaps these videos can change your mind? This is the key to your 10 seconds fame ... hehe
 Tagliatelle was on the menu for me, so I sliced it with about half to 1 cm wide, something finer (say 0.2cm) will give you linguine, something wider than that (2-3cm) will give you parpadelle. It's flexible, no worries...
Wooohoo! We're done and thank God the process went smoothly and dinner is safe hehe. I guess there's no need for the back up dried pasta anymore!
Stay tuned for the next post on the actual cooking with the tagliatelle :)

Real women (men) use rolling pins!
OK, let's get down to business ... The ingredients for making fresh pasta is pretty simple and easy to obtain:
Plain White Flour/Tipo 00 Flour (Around 150g - 200g per person)
Eggs (1 medium egg per 100g of flour - free range preferably)
Yup, that's pretty much what you need. Tipo 00 flour is the finer Italian flour found mostly in Italian delis/specialist shops. I tried with plain flour this time, will let you know of my experiment next on that special flour and see if there's a significant difference. Gadgets wise is simple too: just a sift for the flour and a rolling pin would do, and we're set to go!
Firstly, measure the amount of flour you need, and gently sift them through so you get a nice fine texture to make the mixing process slightly easier.
Firstly, measure the amount of flour you need, and gently sift them through so you get a nice fine texture to make the mixing process slightly easier.
 Using your hands (washed and thoroughly dry!) or a spatula, shape the flour into a mountain structure.
 With your fingers, gently make a well in the center of the flour and break the eggs into the well, both the yolks and egg whites.
 Using a fork or a knife, stir and mix the egg mixture slowly, incorporating the flour with it bit by bit. Try not to rush this and mix thoroughly as it will save more effort in the kneading process later.
 You'll notice that lumps start to form as more flour mixture is added. No worries though, just try your best to even out the lumpy bits and stir in all the flour gradually. Slow and steady :)
 When the mixture is very thick and impossible to mix use the fork/knife, this is where the arm busting kneading process starts! Despite the seemingly intimidating process, dough kneading is stress relieving and pretty therapeutic. Depending on how many people you're feeding, it may also be a good idea to split the dough and work with smaller pieces for starters, or split the workload with your dedicated friend/helper :) Thank God I'd P who was willing to help that day, despite being warned that his dinner may be at risk!
 Here's a bit of a tip on the kneading technique. Kneading isn't exactly pressing, so you don't need your thumbs or fingers to press the dough. Instead, a more energy efficient and pain free way (it matters when you're kneading for at least 30 minutes!) is using the palm of your hand for essentially the "Push-Pull Technique":
Use the heels of your hands and press firmly into the dough, pushing forward slightly. Then pull and fold the far edge of the dough upwards, towards you, and press it into the middle of the ball. Rotate it slightly, too, and repeat the steps until the dough is well mixed, unlumpy and not too sticky. The well kneaded dough ball should look yellowish due to the yolk, with no trace of improperly incorporated white flour.
Do note that in my first attempt I got the flour measurement wrong, and hence the whole pile of extra flour there now. In fact you probably only have a little extra for some dusting later on. With the 100g flour to 1 egg rule and you should be fine :)
Continue kneading ... ***knead^100***
 ... till the flour and egg is properly incorporated ... ***knead^300***
... into a light yellow dough ball ... ***knead^500***
 Do take a short break occasionally as it's understandable that kneading for the first time is pretty tiring for the arms! Try not to take too long though as the dough will dry out and you'll have brittle pastas, which would be shame after all the hard work!
 Just in case, here's a better graphical illustration of the kneading technique:
Use the heel of your hands to compress and push the dough away from you...
 then pull and fold it back over itself...
Give the dough a little turn and repeat the previous step. Another handy tip is to utilize the weight of your body into the motion and get into a rhythm so that it's less tiring for the arms.
I definitely had a new found respect for the bakers who still do kneading the traditional way, they probably also have their dominant arms significantly bigger than the other! But as mentioned before, it's probably a good idea to split the dough that you find too challenging to knead into half and work on them separately. Takes longer, but better result than struggling with the large dough alone!
This whole kneading process took me about 40 minutes, but I think it'd probably be less for those quicker and stronger ones of you out there. As long as you see no lumps and the flour is well mixed , it's ready to rest.
And HOW do you know the dough is ready? POKE it!
 If the dough gently springs back up once you relieve the pressure of your finger, then it's ready :) If not, just continue kneading and the lumps should be evenly mixed by then, it'd be springy in no time! For those who kneaded the dough in smaller portions, don't forget to combine them altogether at the end to rest.
Reaching this far, it's time to congratulate yourself for the hard work :D The hardest part is probably over and you're closer to your own homemade, authentic Italian pasta dinner ...
 You can cover Mr Smiley Dough with a big bowl for a 20 minutes rest, whilst you start off the celebration with a toast to your achievement so far!
Meanwhile whilst the dough is resting, you could also take the opportunity to prepare the ingredients for the pasta sauce of your choice. This would be for the next post, since we're ready to rock and ROLL ...
 ... with the rolling pin and the dough! Let's start simple with the aim of simple pasta shapes :P So nothing complex, just roll the dough as thin as you can make it.
All you do is keep on rollin' ...
 rollin'
rollin' (yeah) ...
 ... till it gets as thin as you can make it to be, ideally 1mm. Don't rush off trying to get a ruler or something to measure for you engineers out there, you'll know it's thin enough when you can see your fingers and palms slightly underneath the rolled pasta sheet.
 I trimmed the uneven bits at the end due to my lousy rolling skills so that it looks nice and rectangular now - It was just an excuse for greedy me to just test those extra bits right away by plunging them into hot boiling water for roughly 2 minutes, and my my they tasted so soft, slippery yet al dente at the same time! First taste of hard labor and I'm excited and pleasantly surprised at the result :D
OK, OK, we've finally reached the best and most crucial part of all this pasta making mumbo jumbo, haha. This part, equally important with how the final dish tastes like with the sauce of your choice, will not only earn you extra brownie points for the audience you're trying to impress, but probably make you the coolest person in the world too... only if it's executed beautifully ...
I'm talking about cutting the pasta with your hands ...
I'm talking about cutting the pasta with your hands ...
 and for those who thought it was a normal, mundane and even an uneventful task, perhaps these videos can change your mind? This is the key to your 10 seconds fame ... hehe
:P I hope it did for you guys, because it's probably one of the reasons I want to make my own pasta from scratch without the boring pasta maker! Trust me, there'll be lots of Oooh's and Aaah's :P
... Dust the sharp knife with flour beforehand, slice through the pasta sheets with speed and accuracy, lifting up the pasta swiftly whilst watching it roll down in style... *priceless*
... Dust the sharp knife with flour beforehand, slice through the pasta sheets with speed and accuracy, lifting up the pasta swiftly whilst watching it roll down in style... *priceless*
 Tagliatelle was on the menu for me, so I sliced it with about half to 1 cm wide, something finer (say 0.2cm) will give you linguine, something wider than that (2-3cm) will give you parpadelle. It's flexible, no worries...
Wooohoo! We're done and thank God the process went smoothly and dinner is safe hehe. I guess there's no need for the back up dried pasta anymore!
Stay tuned for the next post on the actual cooking with the tagliatelle :)


No comments:
Post a Comment