Showing posts with label Italian Cuisine. Show all posts

Friday, August 28, 2009

Aubergine Parmigiana

Aubergine was on good offer in the supermarket and hence this! Easy and no fuss, only downside I'd say is its slightly time consuming, but beats eating the ones outside as this is definitely healthier, so no more guilt after the 2nd helping :)

All you need is some garlic cloves, 2 aubergines, 1 can of 400g chopped tomatoes in tomato sauce, 3 tomatoes (optional), 200g-300g cheese (I had some cheddar, you can use other nice melt-able cheese) , olive oil, salt and pepper

Firstly, slice the aubergine into round cross sections of about 2 inches thick. Note that I have done it length-wise as per the pictures below, but found that it made serving the dish later more difficult in terms of cutting them into portions. Then, brush some olive oil on both sides of the aubergines and season with some salt and pepper. Get your grilling pan and heat it up for some serious grilling!

Grill the aubergines both sides till almost cook and soft. It took me about 5 minutes each side. Be careful not to burn them too much!

The tomato sauce is up next, quite straight forward. I chopped some garlic and fried them till fragrant, before adding the contents of the can to the pot. Lower the heat and simmer the sauce for about 10 minutes till it thickens, finally add a pinch of salt and some basil/oregano if preferred

Then the fun part starts! Don't forget to heat up your oven to 200C for at least 15 minutes beforehand.... With the casserole dish, start with a thin layer of tomato sauce at the bottom to lightly coat it....


... then continue with the grilled aubergines, cheese, sauce, and then repeat again. I added a layer of tomatoes into mine for fun, supplementing the sauce :)

Try not to overflow the dish though! Finish up with a nice layer of cheese and place it in the oven to bake for 30 minutes and its done!

Thursday, June 19, 2008

Edinburgh Eats II

Ok, I'm super tired now on a Wednesday night and have to be in office early tomorrow. With about 6 hours left of my precious beauty sleep, let me just briefly show you the best bits of Edinburgh that I was raving about previously...

After the quaint market, we head towards town center (Princes Street), with many beautiful architectures around such as this ...

And I'm determined not to be like one of them, doing typical boring touristy stuff sitting on one of these red sightseeing buses *shudders*

and instead headed straight for the beautiful park where the Edinburgh castle is! Definitely have to be there to see it for your own eyes really: fresh air, good sun, shady trees, green grass and most importantly no crowds, it was pure bliss just lying down on the grass facing the bright blue sky and watching the day go by ....
I really liked this picture taken by P in particular, super focused on the park surrounding and the greeneries, pretty soothing and calming, my new wallpaper now, lol. Apparently its good for the eyes too, especially at work when staring at computer screens the whole day, its best to take a break and look at something green and faraway ... yup that was totally random :P

And I knew I had to show you guys this Mister Potato statue, as I call it, not sure what it is, or what it was for, probably some memorial, but it's queer shape definitely caught my eye

and of course I have to take some Scottish-y pictures for you, here with a man in his favorite kilt performing on the street ... Super keen guy I must say :)

Next, time to grab some FOOD (finally)! There was a shopping mall nearby and I was super excited to check out the local McDonald's, hoping to see the globalised giant have some interesting local specialties just like McRib in Germany or Green Bean Pie in China.

I was hoping there was a McHaggis or something which would make my day for sure ... to my dismay, there wasn't anything 'local' and all I saw was this typical menu, what a let down!

Nevertheless, we walked around and spotted this really nice looking place called 'The Garden Cafe', which offers alfresco dining, perfect for the sunny weather. You know you can't say know when you get such a nice atmosphere like this....

P ordered Haggis, Neeps and Tatties with Brandy Sauce ... Come on, how can you not order that when you see that funny name?! I couldn't stop laughing at the word Neeps, its probably a Scottish word for mashed swede. Tatties on the other hand is just mashed potatoes, just an old English way to say potatoes I suppose. More importantly, something very Scottish and probably the traditional dish is Haggis - to put it simply its minced animal intestines with spices, something like Christmas stuffings, but the method of cooking is unique, in the sense that it is boiled in animal (usually sheep's) stomach for a few hours.

Sounds gross? But it actually tastes pretty good. Only thing is that I can take it in small doses as the strong flavor of offal is not really my cup of tea. But P absolutely loved it, especially with the brandy sauce ....

Me ? I ordered a Seafood Pizza with Watercress as there were no other interesting Scottish things I'd like to try and the menu is pretty general (pasta, pizza, sandwiches, steak). Pizza was great with the chewy and cheesy texture, a large portion too, unfortunately diminishing marginal returns sets in as I get less satisfaction out of each extra bite, as the pizza loses its chewiness as it gets cold ...
Yes I'm ashamed of myself not having found a fried mars bars place yet and ate a French breakfast and Italian lunch in Scotland, WoooT is THAT?! But I love Edinburgh all in all for its quaint, peaceful and beautiful town, getting all the balances right with a bit of city and a load of countryside :)

Sunday, April 20, 2008

Fresh Homemade Pasta - Part 2

So have any of you tried to make your own fresh pasta yet? Would love to hear how it went or any improvisation suggestion you have!

Anyways, back to the tagliatelle in the previous post ... I wanted something simple, not a over powering sauce since the pasta is the main star of the dish, hence opted for something light and simple, in hope to bring the best of the tagliatelle :)

I decided on Tagliatelle with Cod and Spicy Parsley Sauce. Perhaps something of a random unheard sauce, but it's a combination of my favorite spices - shouldn't go wrong with lots of garlic, parsley, some sliced cod and chili flakes. Here are the prepared ingredients for two:

Cod (2 fillets, sliced in huge chunks)
Parsley (or Coriander will do, finely chopped without the stalks)
1 whole bulb of garlic (or even more if you wish, minced)
Olive oil (abt 3-4 tbsp)
Salt (to taste)
Black Pepper
White wine vinegar
White wine (optional)
Chili flakes (or freshly chopped chilies)
Parmesan cheese


First, heat up a few tablespoon of olive oil for a minute or so. Then add in the garlic and stir fry quickly to avoid overcooking them. As I was lazy and short for time AND hungry (due to all the kneading work with the dough previously), I just added the cod pieces in together to fry, knowing that the fish flakes easily and probably the result will be some sort of mush. My attempt of trying hard not to flip the fish too much isn't effective either, but ah well, stomach rules when it growls :P

Ideally, I intended to grill or pan fry to WHOLE cod fillet before hand and sliced them once they are crisp with the skin. The way to do this is to leave the whole cod fillet as a whole, heat up your grill or pan with a little oil. If you choose to grill, it's best to oil the fish skin a little bit as well so it doesn't stick to the grill pan and make a mess of the beautiful fish skin. 3-4 minutes on each side on medium to high heat should be fine.

For pan fry purposes, you can also pat a little bit of flour on the skin part of the fish to get a nice crispy effect. Put the skin side down on the heated pan with some oil, and let it fry for about 3 minutes before you turn the other side for another 2 minutes or so. Set the fish aside once grilled or pan fried.

Ok, back to my mush :) I added parsley towards the end, with some salt and chili flakes to taste. One important addition is also a bit of white wine vinegar (just a few drops or roughly 1 tbsp would do), somehow I find it adds a little sharpness to the sauce to make it a lil' more exciting than just chili flakes alone. A dash of white wine is always welcomed in this kind of sauce too.

Meanwhile, don't forget to cook the pasta, and if you followed the fresh pasta recipe in the previous post, it'd probably take about 2 minutes in boiling water to cook it. Then, drain it quickly and add to the cod mixture and give it a good toss to coat the pasta.


When its thoroughly mixed, do take a pinch to taste and see if the flavor is fine, or else adjust accordingly. Finally, serve on a nice plate/bowl, garnish with some Parmesan cheese and chili flakes and tuck in!

Phew, after all that ordeal, I'd say it was an interesting experience and nothing beats eating something homemade from scratch :) My pasta definitely still has some way to go in terms of improvement, especially in terms of texture (a bit dry) and thickness (not thin enough, probably about 2mm, as you can see in the pic above). Taste wise was not bad, sauce was not over powering, but there's definitely a difference to the dried pasta, which is usually harder with more 'bite'. Fresh ones are soft, chewy yet retains its al-dente texture giving the best of both worlds. Doing it again? Definitely, despite the tired arms! Gonna try linguine or something more funky like ravioli next time, with a different sauce. Need to be a bit more creative here, no Bolognese , Carbonara or any other sort of sauce that has a bottled version of it hehe. Still inspired by my Da Mario trip, and one day my pasta will get roughly comparable to theirs ...


Saturday, April 19, 2008

Fresh Homemade Pasta - Part 1

So it's time for the homemade pasta challenge folks!


I promise you that your week long wait was well worth it, I certainly found the arm busting experience of making my own tagliatelle from scratch worth while! :) It'd be better if you find a nice comfy couch to sit on whilst reading this long post as this is a COMPLETE, step by step and carefully illustrated guide to making your pasta from scratch.

And yes, no machines/gadgets involved whatsoever, simply because ...

Pasta machines are for babies
Real women (men) use rolling pins!

OK, let's get down to business ... The ingredients for making fresh pasta is pretty simple and easy to obtain:

Plain White Flour/Tipo 00 Flour (Around 150g - 200g per person)
Eggs (1 medium egg per 100g of flour - free range preferably)

Yup, that's pretty much what you need. Tipo 00 flour is the finer Italian flour found mostly in Italian delis/specialist shops. I tried with plain flour this time, will let you know of my experiment next on that special flour and see if there's a significant difference. Gadgets wise is simple too: just a sift for the flour and a rolling pin would do, and we're set to go!

Firstly, measure the amount of flour you need, and gently sift them through so you get a nice fine texture to make the mixing process slightly easier.

Using your hands (washed and thoroughly dry!) or a spatula, shape the flour into a mountain structure.

With your fingers, gently make a well in the center of the flour and break the eggs into the well, both the yolks and egg whites.

Using a fork or a knife, stir and mix the egg mixture slowly, incorporating the flour with it bit by bit. Try not to rush this and mix thoroughly as it will save more effort in the kneading process later.
You'll notice that lumps start to form as more flour mixture is added. No worries though, just try your best to even out the lumpy bits and stir in all the flour gradually. Slow and steady :)

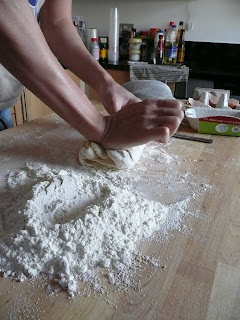
When the mixture is very thick and impossible to mix use the fork/knife, this is where the arm busting kneading process starts! Despite the seemingly intimidating process, dough kneading is stress relieving and pretty therapeutic. Depending on how many people you're feeding, it may also be a good idea to split the dough and work with smaller pieces for starters, or split the workload with your dedicated friend/helper :) Thank God I'd P who was willing to help that day, despite being warned that his dinner may be at risk!

Here's a bit of a tip on the kneading technique. Kneading isn't exactly pressing, so you don't need your thumbs or fingers to press the dough. Instead, a more energy efficient and pain free way (it matters when you're kneading for at least 30 minutes!) is using the palm of your hand for essentially the "Push-Pull Technique":

Use the heels of your hands and press firmly into the dough, pushing forward slightly. Then pull and fold the far edge of the dough upwards, towards you, and press it into the middle of the ball. Rotate it slightly, too, and repeat the steps until the dough is well mixed, unlumpy and not too sticky. The well kneaded dough ball should look yellowish due to the yolk, with no trace of improperly incorporated white flour.

Do note that in my first attempt I got the flour measurement wrong, and hence the whole pile of extra flour there now. In fact you probably only have a little extra for some dusting later on. With the 100g flour to 1 egg rule and you should be fine :)

Continue kneading ... ***knead^100***

... till the flour and egg is properly incorporated ... ***knead^300***


... into a light yellow dough ball ... ***knead^500***

Do take a short break occasionally as it's understandable that kneading for the first time is pretty tiring for the arms! Try not to take too long though as the dough will dry out and you'll have brittle pastas, which would be shame after all the hard work!

Just in case, here's a better graphical illustration of the kneading technique:

Use the heel of your hands to compress and push the dough away from you...

then pull and fold it back over itself...


Give the dough a little turn and repeat the previous step. Another handy tip is to utilize the weight of your body into the motion and get into a rhythm so that it's less tiring for the arms.

I definitely had a new found respect for the bakers who still do kneading the traditional way, they probably also have their dominant arms significantly bigger than the other! But as mentioned before, it's probably a good idea to split the dough that you find too challenging to knead into half and work on them separately. Takes longer, but better result than struggling with the large dough alone!

This whole kneading process took me about 40 minutes, but I think it'd probably be less for those quicker and stronger ones of you out there. As long as you see no lumps and the flour is well mixed , it's ready to rest.

And HOW do you know the dough is ready? POKE it!

If the dough gently springs back up once you relieve the pressure of your finger, then it's ready :) If not, just continue kneading and the lumps should be evenly mixed by then, it'd be springy in no time! For those who kneaded the dough in smaller portions, don't forget to combine them altogether at the end to rest.

Reaching this far, it's time to congratulate yourself for the hard work :D The hardest part is probably over and you're closer to your own homemade, authentic Italian pasta dinner ...

You can cover Mr Smiley Dough with a big bowl for a 20 minutes rest, whilst you start off the celebration with a toast to your achievement so far!
Meanwhile whilst the dough is resting, you could also take the opportunity to prepare the ingredients for the pasta sauce of your choice. This would be for the next post, since we're ready to rock and ROLL ...

... with the rolling pin and the dough! Let's start simple with the aim of simple pasta shapes :P So nothing complex, just roll the dough as thin as you can make it.

All you do is keep on rollin' ...

rollin'


rollin' (yeah) ...

... till it gets as thin as you can make it to be, ideally 1mm. Don't rush off trying to get a ruler or something to measure for you engineers out there, you'll know it's thin enough when you can see your fingers and palms slightly underneath the rolled pasta sheet.

Finally, just fold in the sheet from both ends, in 2 inches/5cm each time, until you reach towards the center.

I trimmed the uneven bits at the end due to my lousy rolling skills so that it looks nice and rectangular now - It was just an excuse for greedy me to just test those extra bits right away by plunging them into hot boiling water for roughly 2 minutes, and my my they tasted so soft, slippery yet al dente at the same time! First taste of hard labor and I'm excited and pleasantly surprised at the result :D


OK, OK, we've finally reached the best and most crucial part of all this pasta making mumbo jumbo, haha. This part, equally important with how the final dish tastes like with the sauce of your choice, will not only earn you extra brownie points for the audience you're trying to impress, but probably make you the coolest person in the world too... only if it's executed beautifully ...

I'm talking about cutting the pasta with your hands ...

and for those who thought it was a normal, mundane and even an uneventful task, perhaps these videos can change your mind? This is the key to your 10 seconds fame ... hehe


:P I hope it did for you guys, because it's probably one of the reasons I want to make my own pasta from scratch without the boring pasta maker! Trust me, there'll be lots of Oooh's and Aaah's :P

... Dust the sharp knife with flour beforehand, slice through the pasta sheets with speed and accuracy, lifting up the pasta swiftly whilst watching it roll down in style... *priceless*


Voila!
My
fresh tagliatelle ...

Tagliatelle was on the menu for me, so I sliced it with about half to 1 cm wide, something finer (say 0.2cm) will give you linguine, something wider than that (2-3cm) will give you parpadelle. It's flexible, no worries...

Wooohoo! We're done and thank God the process went smoothly and dinner is safe hehe. I guess there's no need for the back up dried pasta anymore!

Stay tuned for the next post on the actual cooking with the tagliatelle :)


Saturday, April 12, 2008

Inspired by Da Mario

Da Mario is the type of restaurant that I'd love to keep quiet about and not share with anyone, simply because it's the type of restaurant which you'd thought had extinct by now and once publicized quality tends to go down ... But they have maintained their standards thus far despite the excellent reviews by loyal patrons for years, so I'm going to let you into this little secret :)

Located in Covent Garden, one would think that this is just another touristy Italian place with its typical pasta and pizza dishes. Not Da Mario though, a family run trattoria style restaurant, located on Endell Street, slightly away from the mad shopping crowd, and boasts a merry and chatty atmosphere (so Italian!), neutral deco and VERY reasonable prices! More importantly, I went there last week with the aim to try the authentically home made fresh pasta, which completely blew P and me away!

My camera went bombastic halfway through, so apologies for the photo quality of the starters: Garlic bread (not photo) and Baked Aubergine in Tomato Sauce. This is a rather dark photo of the aubergine dish. Can't believe I only learn to appreciate this purple vegetable only since 13! Portion was small, but still good to share, as you don't want to fill up too much before the major star of the meal appears :)

Da Mario doesn't give you those main stream pasta sauces you see marketed everywhere, no such thing as Bolognese, Carbonara, Al Fredo, Arrabiata, or Rigatoni. Great for those who think going to Italian restaurants being a waste of time (and money) given that you can buy fresh pasta/pasta sauces, or pizzas and jostle up some Italian meal. In addition to the standard menu, Da Mario has daily specials to fit in seasonal ingredients into their refreshing menu.

For my main, I had Tagliatelle Gamberoni, a dish of fresh tagliatelle with king prawns, cherry tomatoes, sliced cucumber and chili in a special brandy sauce, served with some grated Parmesan cheese and ground black pepper. Flavor wise it's out of this world! The quality in the fresh pasta is noticeable - it's slightly softer and chewier, yet still al dente, i.e. still has some bite. The brandy sauce adds a slight thick creaminess to the light tomato based sauce, which I suspect is made using good quality prawn stock with a mild sweetness towards the end. And best part is the sauce is not over powering the fresh bursty prawns and sweet cherry tomatoes, just enough to coat the pasta and giving flavor to the mild cucumber slices - perfection! :D

P was adventurous and went for Casarecci Pasta with Chopped Italian Sausage Meat and Broccoli. Anything with sausage meat is usually pretty flavorful, but we were more intrigued about the casarecci pasta, and how broccoli can fit well with pastas in general, as it seemed a pretty uncommon combination to me.

By the way, don't you think Italians have a beautiful accent? Listening to the waiter explaining what is Casarecci pasta like is like music to your ears, lol. Maybe I'd just been influenced by The Godfather movies starring Al Pacino and Marlon Brando. Anyways, *slaps forehead*, back to pastas...

Casarecci pasta is shaped like a very narrowly twisted and rolled tube. Upon close observation, it looks like an "S" if turned and viewed from the end and is about 2 inches long. P also fell head over heels in love with his choice of pasta. The sausage meat was nicely seasoned and not too salty. I had a taste of casarecci too and its awesome since its twirly shape manages to capture and hold on to more creamy sauce. Broccoli balances the dish by giving it a bit of a crunch and goes surprising well with the pasta.


Well what can I say? Having done 2 courses that exceeded expectations, I was keen to check out the dessert menu to satisfy my sweet tooth. Their home made apple pie is famous from the reviews I've read, but way too heavy at that time after the heavy meal. Sharing a Tartufo Nero seems perfect: a vanilla ice cream with hazelnut cream, topped with chocolate shavings and chopped hazelnuts. Picture doesn't look as impressive due to bad lighting, but tastewise it's good stuff.


My advice? Visit Da Mario for for the mains, especially authentic fresh pastas/lasagnes, which outshines the starters and desserts. In fact, I probably might go for 3 main dishes to share to try out more main dishes the next time I visit :)

In fact, I'm so inspired by Da Mario that I want to make my own fresh pasta today, since I have 3 other willing guinea pigs. Will let you know on my progress/outcome real soon this week!

Da Mario
63 Endell Street,
London, WC2H 9AJ
(Advanced booking recommended)